Need to create a contact sheet?
Use BeFunky collage maker!-I would reccomed uploading your photos to drive BEFORE class. its just easier that way. Otherwise dont forget your SD card or camera so you can turn in your work!
-You will be creating a contact sheet like the image below to prove that you took all 25+ photos.
You created something called a contact sheet to turn in your photos. Contact sheets go as far back as black and white film. A contact sheet is a good way of looking at your entire shoot at once to decide what photos you want to process.
Photoshop tools we will be using for this project include
-Basic editing. Contrast/exposure/ levels ect..
-layers
-renaming layers
-Layer masks
-Brushes-- Color picker, arrow and change to black and white
-the bracket keys that look like this [ ] next to the letter p on your keyboard will help to make your brush bigger or smaller.
Today in Class
- use images online to practice layer masks.
-You can upload your practice to your extra work if you wish
-Finish your about me!
Step by Step Directions for Photoshop
 -Open your fence photo in Photoshop
-Rename the layer FENCE
-Open the photo that you want to "shine though the holes" the zoomed in pic
-Pull your tabs down so the photos are loose in Photoshop
-Drag your zoomed photo on top of the fence photo
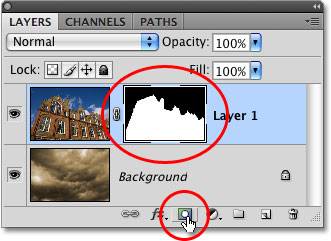
-At the bottom of the layers panel there is a box with a circle in it---that is the layer mask
-Hold down the ALT key and press the layer mask
-A black box should show up next to your top layer. The top layer will also dissapear
-Use the white brush to erase and use the black brush to add back.
NEXT- make a school pintrest account call it your name photography 1
link your pintrest to your blog- add a gadget
&&&&&
update your about me page
*I will share a link with you to add your URL soon, make sure it is ready!!!!
5th hour URL
6th hour URL
Use BeFunky collage maker!-I would reccomed uploading your photos to drive BEFORE class. its just easier that way. Otherwise dont forget your SD card or camera so you can turn in your work!
-You will be creating a contact sheet like the image below to prove that you took all 25+ photos.
You created something called a contact sheet to turn in your photos. Contact sheets go as far back as black and white film. A contact sheet is a good way of looking at your entire shoot at once to decide what photos you want to process.
Photoshop tools we will be using for this project include
-Basic editing. Contrast/exposure/ levels ect..
-layers
-renaming layers
-Layer masks
-Brushes-- Color picker, arrow and change to black and white
-the bracket keys that look like this [ ] next to the letter p on your keyboard will help to make your brush bigger or smaller.
Today in Class
- use images online to practice layer masks.
-You can upload your practice to your extra work if you wish
-Finish your about me!
Step by Step Directions for Photoshop
 -Open your fence photo in Photoshop
-Rename the layer FENCE
-Open the photo that you want to "shine though the holes" the zoomed in pic
-Pull your tabs down so the photos are loose in Photoshop
-Drag your zoomed photo on top of the fence photo
-At the bottom of the layers panel there is a box with a circle in it---that is the layer mask
-Hold down the ALT key and press the layer mask
-A black box should show up next to your top layer. The top layer will also dissapear
-Use the white brush to erase and use the black brush to add back.
NEXT- make a school pintrest account call it your name photography 1
link your pintrest to your blog- add a gadget
&&&&&
update your about me page
*I will share a link with you to add your URL soon, make sure it is ready!!!!
5th hour URL
6th hour URL
No comments:
Post a Comment